Friday, April 20, 2012

Cleaning Up my Red Bubble

I've been thinking about cleaning up my Red Bubble site for a while now. And now that it's spring, there's no time like the present! I like all of the pictures that I have featured on Red Bubble, but I have an awful lot of them, especially Lego pics. I remember reading that it's a good idea to cycle out your old pictures on Red Bubble to keep your portfolio fresh. So that's what I'm going to do this month, cycling out some of my least popular pieces to make room for future new ones. Rather than just deleting them all, I am going to lower my markup on them until the end of the month so they are all on sale! Red Bubble has their prices set for manufacturing the prints, so I cannot lower that cost. But I set the markup on all of my pictures. So for the next ten days, I am putting these pictures on sale, after which they will be deleted from Red Bubble (but don't worry, they'll still be visible on Flickr) Lego:
Flowers:
Animals:
Black and Whites/Scenics
Miscellaneous (temporarily created for these pictures):

Wednesday, April 11, 2012

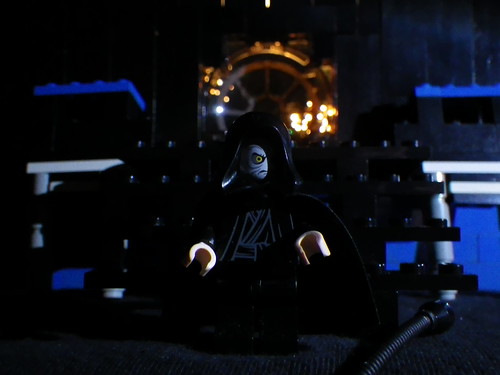
Death Star Throne Room

Death Star Throne Room by s.kosoris Death Star Throne Room, a photo by s.kosoris on Flickr.
I found this picture quite awhile ago and absolutely loved it. I also love the Emperor minifig, so I've been toying with attempting to recreate it with Lego for quite some time now. I acquired the pieces to build the Emperor's chair from Final Duel 1. Once all the pieces were here, I realized I only really needed the window for this but that's okay (now the Emperor has his chair).
I finally sat down yesterday and made the backdrop. I think it turned out reasonably well. I decided to use blue legos to kind of mimic the lighting behind the stairs. I originally wanted to use gray but I didn't have nearly enough bricks so blue it was. To get the stars in the window, I used a friend's suggestion: I took a black piece of construction paper and poked a bunch of holes into it. I then placed my flashlight behind the paper to light the holes up.
Lighting the actual picture was pretty tricky, especially now that I was using my normal flashlight for the stars. I tried a second flashlight, but the light it threw wasn't right. I then switched to a book light which I covered with a kleenex. The result was this subdued lighting, which I thought was perfect.
Of course, now that the set up was finished, I then had to experiment with where to cast the light. I ended up taking over 40 pictures before being able to decide on a couple I really liked. I ended up posting this one because everything just seemed to work: the window was clear, the lighting was good, and you can see the backdrop reasonably well. I really liked three of the others as well but none of them worked the way this version did.
If you know who the artist is for the original picture, please let me know so I can give proper credit!